The AutoPrint feature makes it possible to have messages and documents print automatically as they are received to your DTN DataConnect mailbox without you having to login to DTN DataConnect.
-
Standard version: When you log on to DTN DataConnect, a tray application will open to let you know the application is active. Any unprinted documents in queue will automatically print. After that, the system tracks the arrival of any new messages and automatically print them as they are received. When you log off, documents are still received but not printed.
-
Enhanced version: Works much the same as the Standard version, except users can configure which documents should be printed when received and which should be printed at fixed, user-defined times. With fixed-time printing, you also have the option of defining the order in which documents should be printed. If something changes, you have to option to override the fixed time and print documents on demand.
NOTE: Translated documents are not included in AutoPrint at this time.
AutoPrint tasks
Install AutoPrint
Location: DTN DataConnect > AutoPrint Settings
This procedure installs the AutoPrint icon (a T icon) to the system tray of your Microsoft Windows task bar. When you click the icon, a menu of options display. From here you can view messages, change AutoPrint settings, install updates, and view the AutoPrint activity log.
- Click Download Client. A File Download box opens.
- Click Run. The installation file downloads
- Click Unzip. The Install Wizard appears.
- Follow the Install Wizard instructions. By default, AutoPrint will be installed to a DTN Group folder in your All Programs folder. A message box opens.
- Click OK. The AutoPrint settings screen opens.
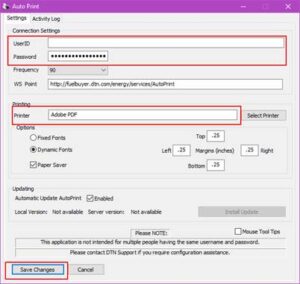
- Add your AutoPrint settings:
-
- UserID: (required) Enter your DTN DataConnect® username.
- Password: (required) Enter your DTN DataConnect password.
- Frequency: (required) Select the number of seconds to indicate how often AutoPrint should check for new documents to print. Defaults to 90 seconds.
- Printer: (required) Select the printer where documents will be printed.
- Automatic Update AutoPrint: Click to enable AutoPrint to automatically update when new versions are made available.
- Click Save Changes. AutoPrint logs into the server.
- Click Yes to register your PC. The AutoPrint T icon appears in the system tray of your task bar.
Restart AutoPrint
AutoPrint will automatically restart when you turn on your PC.
- From the Windows Start menu, select All Programs.
- Scroll to DTN and click AutoPrint.
Update AutoPrint Manually
If you have selected to manually update AutoPrint when new releases become available, an orange asterisk will appear in the system tray of the taskbar when a new version is available.
- In the taskbar, click the T icon. A menu of options appear.
- Select Install Update.
Add AutoPrint – Enhanced Version
Location: DTN DataConnect > AutoPrint Settings
(Gold and Platinum subscribers only)
- Select a Document Type Filter for each document type.
Options are:
-
- Continuous: Indicates you want the corresponding document type to automatically print when it is received.
- Fixed: Indicates you want the corresponding document type to print at a fixed, user-defined time.
- Excluded: Indicates that you do not receive the corresponding document type or you do not want it to print.
- Document Grouping: You can group documents so that those documents are printed together.
Options are:
-
- None
- Group by supplier then document type
- Group by document type then supplier
- Select a Print Sequence. This option applies to fixed-print documents only. Documents may be printed from oldest to newest or vice versa.
- Click Update.
- Click Download Client.
- Follow the online instructions to download the AutoPrint tray.
Print Documents on Demand – Enhanced Version
(Gold and Platinum subscribers only)
This procedure prints messages in your DTN DataConnect® mailbox which have not yet been printed.
- Click the T icon in your task bar. A menu opens.
- Select Print Latest Messages.
AutoPrint Troubleshooting – Uninstalling and Reinstalling
Location: DTN DataConnect > AutoPrint Settings
Section 1: Closing AutoPrint and Running as Administrator
Make sure the AutoPrint program is closed. To do this, follow the steps below:
- In the system tray on the Windows task bar, locate the orange box with the T in it.
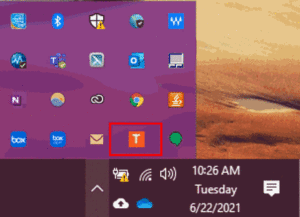
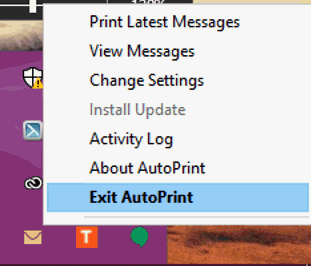
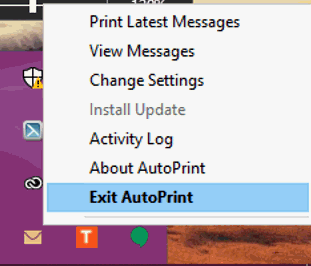
- Right click on the icon and choose Exit AutoPrint.
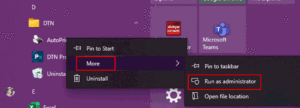
- Open the Start Menu and open the DTN folder.
- Right click on the AutoPrint program within the folder, click More and then Run as administrator.
The program should begin printing messages. If not, continue to Section 2.
Section 2: Uninstalling AutoPrint
Make sure the AutoPrint program is closed. To do this, follow the steps below:
- In the system tray on the Windows task bar, locate the orange box with the T in it.
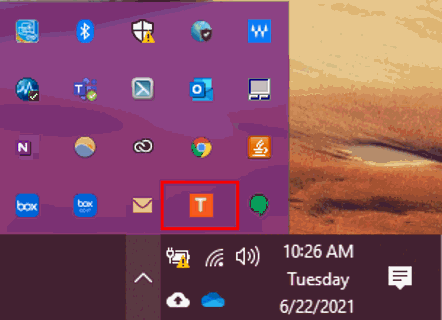
- Right click on the icon and choose Exit AutoPrint.
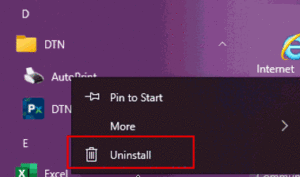
- Open the Start Menu and open the DTN folder.
- Right click on the AutoPrint program within the folder and choose the ‘Uninstall’ option
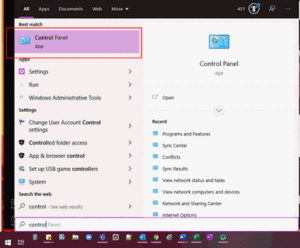
If you cannot find the program on the Start Menu, follow the steps below:
- Type in Control Panel and click Open.
- Click the Uninstall a Program underneath the Programs header.
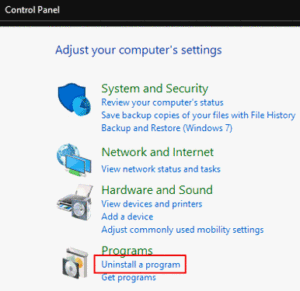
- Find AutoPrint in the list of programs, right click it and select Uninstall.
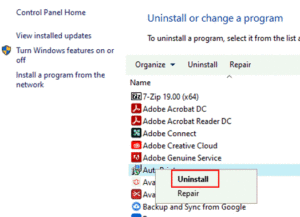
- Once the program is uninstalled, restart your computer.
Section 3: Reinstalling AutoPrint after Restarting
After your computer has restarted, follow the steps below to reinstall the program:
- Log into DataConnect – www.dataconnect.dtn.com.
- Click DataConnect on the menu bar.
- Click AutoPrint Settings on the left side.

- Click Download Client.
- Once the installer finishes downloading, open it. A box will pop up.
- Click Unzip. The installer is being unzipped from the downloaded folder.
- The InstallShield Wizard window opens. Click Next.
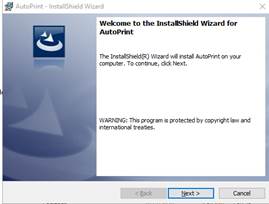
- Destination Folder Page – The next step is the Destination Folder. Click Next. The program will be placed under the same DTN folder as the previous install.
- Ready to Install the Program Page – Click Install. The program will now be installed.
- InstallShield Wizard Completed Page – This indicates that the program was successfully installed. Select the Launch AutoPrint check box and click Finish.
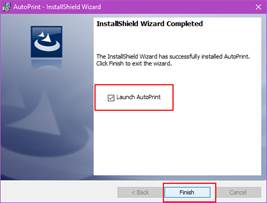
- Once the box closes, the program has been successfully installed. The following message will appear:
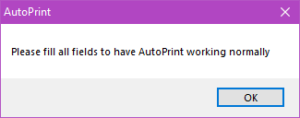
- Click OK and the settings page will open.
- Enter your DataConnect UserID and Password.
- Verify that the printer is correct. If it is not correct, click Select Printer.
- Click Save Changes.
- The following message will pop up. Click Yes.

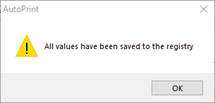
- Another message will pop up. Click OK.
- You can close out of the Settings box.
If you do not see the prompt to fill out the settings for AutoPrint, follow the steps below then fill out the form exactly like the steps above list.
- Go back to the corner of your computer where your program icons are located. Find the orange box with the ‘T’ in it.
- Right click on the icon and select Change Settings.
- Go back to section 3, number 14 and follow the steps to update the settings page.
Once all steps have been completed, AutoPrint should begin working as normal.